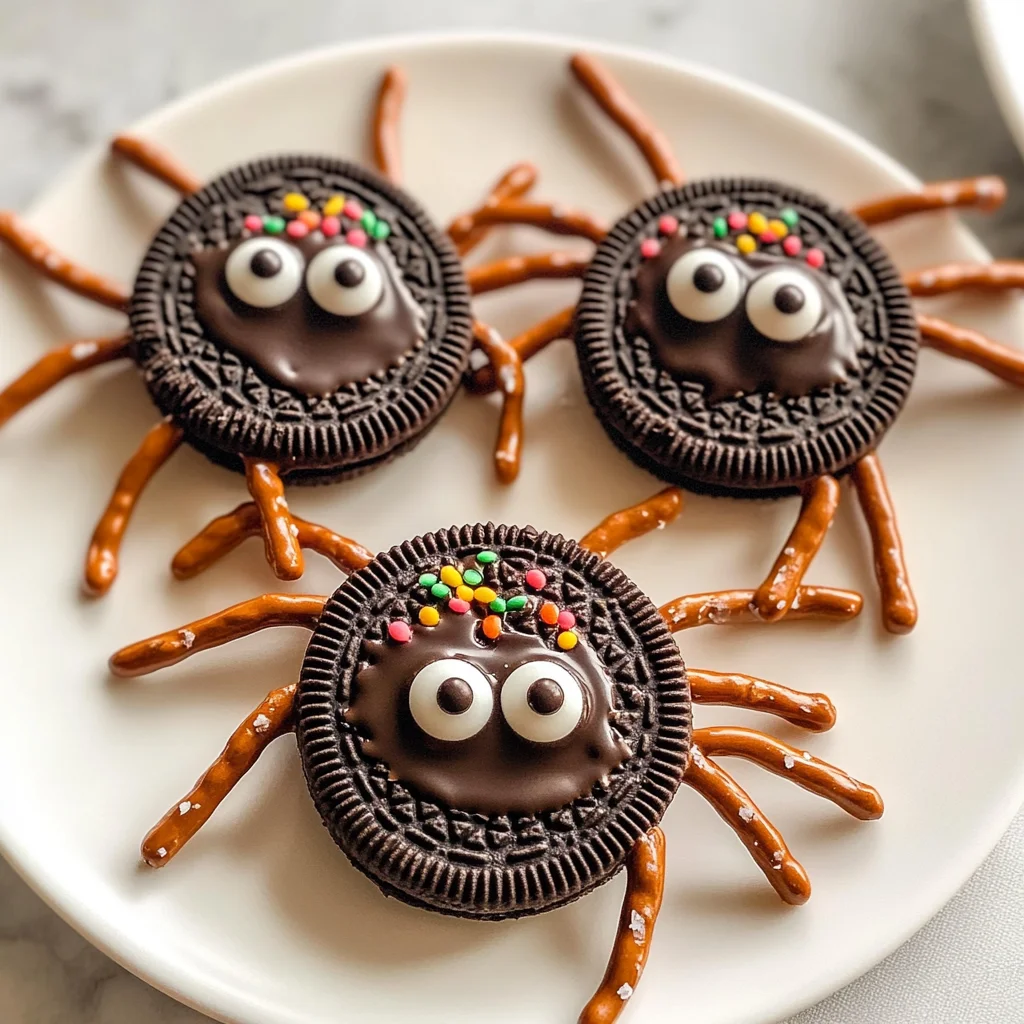
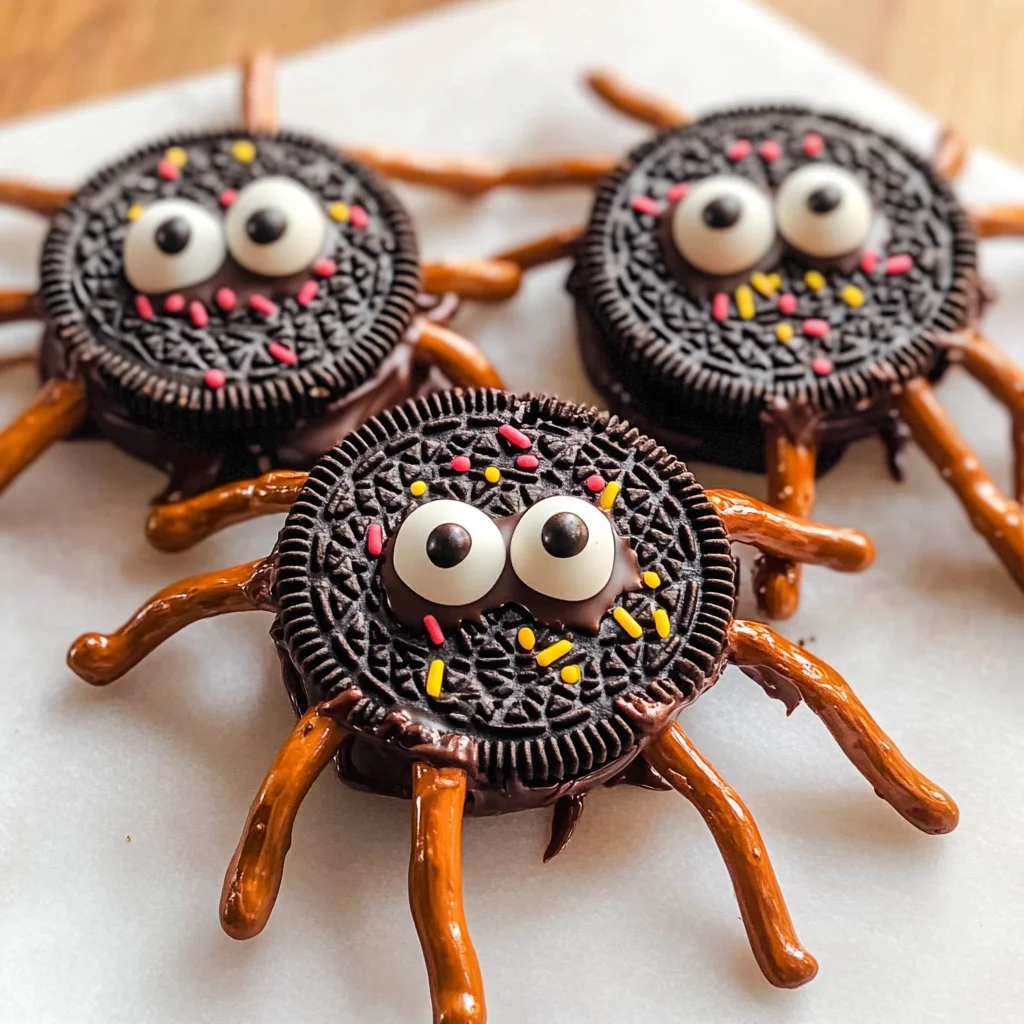
Oreo Spider Halloween Cookies
Get into the spooky spirit with these Oreo spider Halloween cookies! Perfect for your next Halloween party or a fun activity to do with the kids, these cookies are not just treats but also a delightful craft. The combination of creamy Oreos and the cute spider design makes them a standout treat that will leave everyone wanting more!
Why You’ll Love This Recipe
- Simple and Quick: With just 20 minutes of prep time, you can whip up these fun cookies without any fuss.
- Kid-Friendly Fun: Involve the kids in making these spooky treats; it’s a great way to bond and get creative!
- Festive and Fun Appearance: These cookies look fantastic on any Halloween table, adding an element of excitement.
- Versatile Design: You can personalize the spiders with different sprinkles or candy for unique variations.
- Delicious Flavor: The combination of chocolate and Oreos is always a crowd-pleaser.
Tools and Preparation
To make your Oreo spider Halloween cookies, you’ll need some essential tools. Having the right equipment makes the process smoother and more enjoyable.
Essential Tools and Equipment
- Microwave-safe bowl
- Spoon or spatula
- Baking tray
- Refrigerator
Importance of Each Tool
- Microwave-safe bowl: Ideal for melting chocolate safely without burning it.
- Spoon or spatula: Ensures even distribution of melted chocolate on the cookies for a perfect finish.
- Baking tray: Provides a stable surface to assemble your cookies before chilling them.
- Refrigerator: Helps set the chocolate quickly, ensuring your cute spider designs hold their shape.
Ingredients
Get ready to gather your ingredients for these delightful Oreo spider Halloween cookies!
For the Cookies
- 1/2 cup chocolate chips (dairy free)
- 1 teaspoon coconut oil
- 12 Oreo cookies (Halloween kind or double stuffed)
- 36 pretzel sticks
- 12 dozen small candy eyeballs
- 3 tablespoons sprinkles
How to Make Oreo Spider Halloween Cookies
Step 1: Melt the Chocolate
In a microwave-safe bowl, combine 1/2 cup chocolate chips and 1 teaspoon coconut oil. Microwave for about one minute or until completely melted. Stir well until smooth.
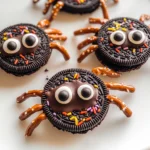
Step 2: Prepare the Oreo Spiders
- Break 36 pretzel sticks in half.
- Twist each Oreo cookie to gently remove the top wafer (the blank side).
- Press three pretzel halves into the cream side of each Oreo as legs.
- Drizzle about 1/2 teaspoon melted chocolate over the pretzel legs, then place the top wafer back on.
Step 3: Decorate Your Cookies
Dip one side of each assembled cookie into the remaining melted chocolate.
– Place 2–3 candy eyeballs on top while still wet.
– Add some colorful sprinkles for extra flair.
Step 4: Chill to Set
Place your decorated cookies in the refrigerator for at least 10 minutes or until the chocolate is firm. Enjoy these spooky treats at your next gathering!
How to Serve Oreo Spider Halloween Cookies
These Oreo spider Halloween cookies are a delightful treat that can be enjoyed in various ways. Whether you’re hosting a party or just having fun with the kids, here are some creative serving suggestions to make your presentation even more festive.
Fun Party Platter
- Include a variety of Halloween-themed treats alongside the cookies. You can add candy corn, ghost-shaped marshmallows, and mini pumpkins for a colorful display.
Individual Treat Bags
- Package each cookie in small, clear treat bags tied with orange or black ribbons. This makes for easy handouts during parties or school events.
Spooky Dessert Table
- Create a themed dessert table featuring your Oreo spider cookies. Use black tablecloths and add spooky decorations like fake spiders and cobwebs for an eerie effect.
Halloween Movie Night Snack
- Serve the cookies as part of a spooky movie night spread. Pair them with popcorn and other themed snacks for an engaging experience.
How to Perfect Oreo Spider Halloween Cookies
To ensure your Oreo spider Halloween cookies turn out perfectly every time, follow these helpful tips for success.
- Use Fresh Ingredients: Always use fresh chocolate chips and pretzels for the best taste and texture.
- Melt Chocolate Carefully: Microwave the chocolate in short bursts to avoid burning it. Stir between intervals for an even melt.
- Adjust Cookie Assembly: Feel free to alter the number of pretzel legs based on your preference; you can have fewer or more legs!
- Chill Thoroughly: Allow enough time in the fridge for the chocolate to harden completely before serving to maintain their shape.
- Experiment with Toppings: Try different kinds of sprinkles or edible glitter to give your cookies a unique twist.
Best Side Dishes for Oreo Spider Halloween Cookies
Pairing side dishes with your Oreo spider Halloween cookies can elevate your Halloween spread. Here are some great ideas that complement the spooky theme.
- Pumpkin Spice Muffins: Soft muffins filled with pumpkin flavor will enhance the fall spirit.
- Ghostly Fruit Cups: Assemble cups of mixed fruit topped with ghost-shaped yogurt-covered raisins for a refreshing treat.
- Witch’s Brew Punch: Create a fun non-alcoholic punch using green apple juice and sparkling water, garnished with gummy worms.
- Cheesy Spider Dip: Serve a creamy cheese dip shaped like a spider, accompanied by crunchy vegetable sticks.
- Monster Veggie Platter: Arrange colorful vegetables in monster shapes to encourage kids to snack healthily amidst all the sweets.
- Bat-Shaped Sandwiches: Cut sandwiches into bat shapes using cookie cutters for an adorable addition to your table.
- Candy Corn Jello Cups: Layer yellow and orange jello in clear cups for a vibrant treat that fits right into the theme.
- Chocolate-Covered Pretzel Brooms: Make pretzel stick brooms dipped in chocolate and decorated with candy pieces, perfect alongside your cookies.
Common Mistakes to Avoid
- Avoid overheating chocolate. Melt chocolate slowly in the microwave, checking every 30 seconds to prevent burning.
- Don’t skip the chilling step. Allow the cookies to chill for at least 10 minutes; this sets the chocolate and allows your decorations to stick better.
- Be careful with pretzel placement. Make sure the pretzel legs are secured well in the cream before adding the top wafer to avoid them falling off.
- Don’t use too many sprinkles. A light hand on the sprinkles keeps it fun without overwhelming the cookie’s design.
- Avoid using non-dairy chocolate chips if not needed. Ensure all ingredients match your dietary needs for a successful treat.
Storage & Reheating Instructions
Refrigerator Storage
- Store cookies in an airtight container for up to 5 days.
- Place parchment paper between layers to prevent sticking.
Freezing Oreo Spider Halloween Cookies
- Freeze cookies in a single layer on a baking sheet before transferring them to an airtight container.
- They can be stored for up to 3 months; label with date for easy reference.
Reheating Oreo Spider Halloween Cookies
- Oven: Preheat to 350°F (175°C) and warm cookies for about 5 minutes.
- Microwave: Heat one cookie at a time for about 10-15 seconds until just warm.
- Stovetop: Use a skillet over low heat, warming each cookie briefly without letting them become too soft.
Frequently Asked Questions
What are Oreo Spider Halloween Cookies?
Oreo Spider Halloween Cookies are fun, decorated treats made with Oreo cookies, pretzel legs, and candy eyes, perfect for Halloween celebrations.
Can I customize my Oreo Spider Halloween Cookies?
Absolutely! You can change the colors of sprinkles or use different candies for eyes to fit your theme or personal preference.
How do I make these cookies allergy-friendly?
Choose gluten-free Oreos and ensure that all other ingredients are free from allergens as needed, like dairy-free chocolate chips.
How long does it take to make Oreo Spider Halloween Cookies?
The total preparation time is approximately 20 minutes, making it a quick and delightful treat for any occasion.
Can kids help with making these cookies?
Yes! This recipe is great for kids as they can participate in assembling and decorating their spooky spiders!
Final Thoughts
These Oreo spider Halloween cookies are not only adorable but also incredibly versatile. You can adapt them to fit any festive theme or taste preference with various toppings. Try making them with friends or family for a fun activity that brings Halloween spirit into your kitchen!
Oreo Spider Halloween Cookies
Get ready to impress your guests with these delightful Oreo Spider Halloween Cookies! These fun and spooky treats combine the classic taste of Oreos with a whimsical spider design, making them perfect for Halloween gatherings or a creative activity with kids.
- Prep Time: 20 minutes
- Cook Time: 0 minutes
- Total Time: 20 minutes
- Yield: Makes approximately 12 cookies 1x
- Category: Dessert
- Method: No-bake
- Cuisine: American
Ingredients
- 1/2 cup dairy-free chocolate chips
- 1 teaspoon coconut oil
- 12 Oreo cookies
- 36 pretzel sticks
- 12 candy eyeballs
- 3 tablespoons sprinkles
Instructions
- In a microwave-safe bowl, melt the chocolate chips and coconut oil until smooth (about one minute). Stir well.
- Break the pretzel sticks in half. Twist apart each Oreo and press three pretzel halves into the cream side for spider legs. Drizzle melted chocolate over the legs and replace the top wafer.
- Dip one side of each cookie in melted chocolate, then place candy eyeballs on top while wet. Add sprinkles for decoration.
- Chill in the refrigerator for at least 10 minutes to set.
Nutrition
- Serving Size: 1 cookie (30g)
- Calories: 150
- Sugar: 8g
- Sodium: 60mg
- Fat: 7g
- Saturated Fat: 4g
- Unsaturated Fat: 2g
- Trans Fat: 0g
- Carbohydrates: 20g
- Fiber: 1g
- Protein: 1g
- Cholesterol: 0mg